You might have an amazing business idea or see your future as an android developer but you don't know how to start developing then you have landed to a perfect place. This happens to many of us that we have a blueprint of an application ready in our minds but we don't have a clue where to start.
Learning to code precisely is a difficult task in itself, especially when talking of android programming.You have to understand Object Oriented Programming Concepts and Java Language. You also have to install all android developing tools and software.
You can find immense amount of data floating on the internet about Android programming. Our aim behind developing this article is to develop an approachable guide in order to make the process hassle-free.
Prerequisites:
System Requirements
Windows
- Microsoft® Windows® 7/8/10 (32- or 64-bit)
- 3 GB RAM minimum, 8 GB RAM recommended; plus 1 GB for the Android Emulator
- 2 GB of available disk space minimum,
4 GB Recommended (500 MB for IDE + 1.5 GB for Android SDK and emulator system image) - 1280 x 800 minimum screen resolution
Mac
- Mac® OS X® 10.10 (Yosemite) or higher, up to 10.13 (macOS High Sierra)
- 3 GB RAM minimum, 8 GB RAM recommended; plus 1 GB for the Android Emulator
- 2 GB of available disk space minimum,
4 GB Recommended (500 MB for IDE + 1.5 GB for Android SDK and emulator system image) - 1280 x 800 minimum screen resolution
Linux
- GNOME or KDE desktopTested on Ubuntu® 14.04 LTS, Trusty Tahr (64-bit distribution capable of running 32-bit applications)
- 64-bit distribution capable of running 32-bit applications
- GNU C Library (glibc) 2.19 or later
- 3 GB RAM minimum, 8 GB RAM recommended; plus 1 GB for the Android Emulator
- 2 GB of available disk space minimum,
4 GB Recommended (500 MB for IDE + 1.5 GB for Android SDK and emulator system image) - 1280 x 800 minimum screen resolution
Also see the Android Emulator requirements.
Software Requirements:
Software Requirements:
- Integrated Development Enviorenment (IDE): Android Studio Itself: Get it from Here
- Latest JDK installed.
- Android SDK after installing Android Studio.
STEP 1: Setting Up Android Studio
Many of the aspirers make it upto here successfully but fail to go further and leave android studio installed on their systems. Make sure you do not end up like them all. Install Android Studio, Android SDK, SDK Tools and Android Virtual Device(If you don't have an Android 6.0(or up) Android Device). Once you have managed to set up the development enviorenment, launch the android studio application. Once it has launched successfully, you are all set to become a developer!
STEP 2: Start a New Project
Once you are all set with the development enviorenment(IDE, JDK, Android SDK, AVD) then its time to start a new project.
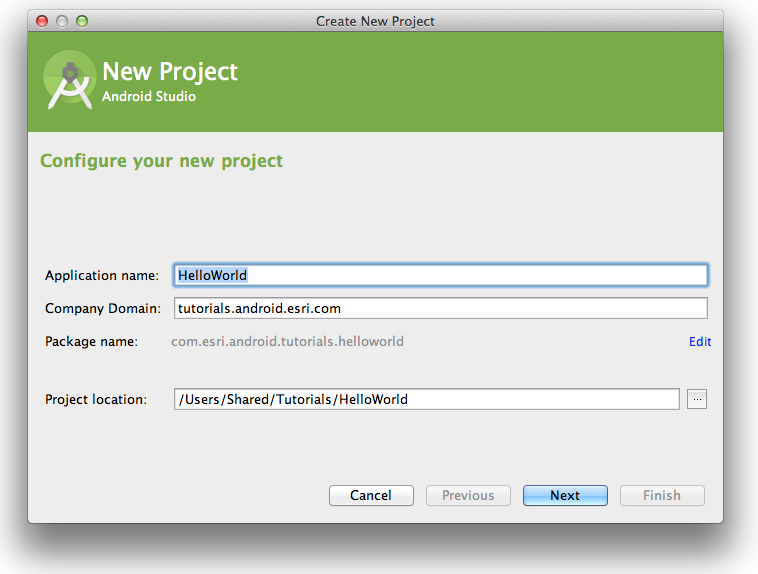
Choose Start a new Android Studio Project – it’s finally happening!
Enter the name you want for your application and your ‘company
domain’. Together these elements will be used to create your package
name with the following format:com.companyname.appname
Next you need to decide what type of device you’re going to be developing for and in this case we’ll start with the Phone and Tablet option. Other options are TV, Wear and Glass. It’s fine if you want to develop for a myriad of platforms in the future – that’s one of the wonders of Android – but let’s start with something a bit more straightforward to begin with.
The other choice you have to make at this stage is the ‘Minimum SDK’. This is the lowest version of Android you want to support. Just enter the latest version of Android in here, because relatively few people actually have the latest version of Android installed on their device at any given time. You want to support phones that are still running older versions in order to reach the largest possible audience – especially overseas.
STEP 3: Choosing Activity
This defines how your acitivity looks like along with its behavior. This will be the main page of you app which is reflected when app is launched. Think of these like templates; do you want to have the title of your
app along the top of the screen, or do you want your UI to fill the
whole display? Do you want to start off with some elements
ready-designed for you? Is your app primarily going to use Google Maps
(don’t go here for a bit, things get more complicated with Google Play
Services).

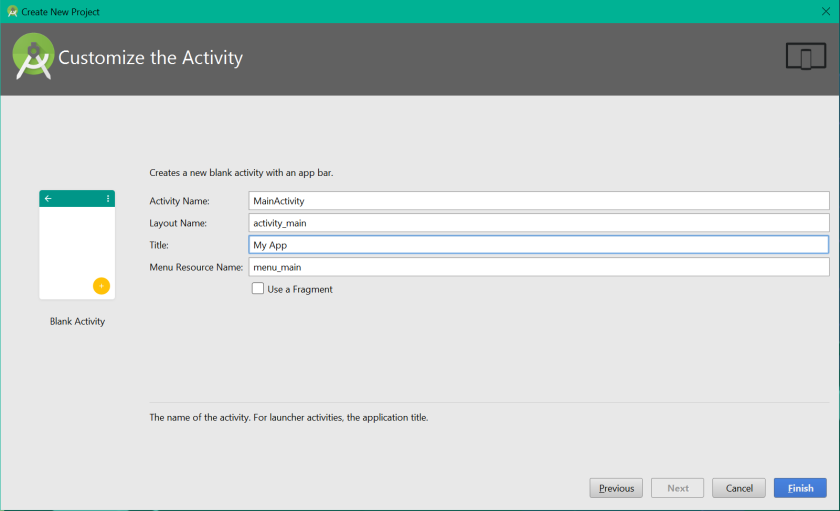
For your first project, you can select from Blank Activity and Empty Activity to keep things as simple as possible. Click next again and you will have last few options.
This screen defines the
main activity name and its layout. This activity wil be loaded by
default when your application will be launched.
This layout will be working like an UI for your app. It will be basically an XML file- An Extensible Markup Language. The Java code for the activity meanwhile says what the elements
on the screen do when pressed etc. It’s fine to leave the default name
here as ‘activity_main’. Lastly, choose a name for the menu and for the
title. Pick something nice for the title, as your users will be able to
see this at some points. Click next… and now you get to see your app!
The Next Step of Installing an Engine in the Chassis will be done in our Next Blog Post of Android App Developing. Till then, you can equip yourselves with handy skills on XML and JAVA.


